ESTHER RIMINGTON - GAMES DESIGN PORTFOLIO
Esther Rimington / Star Wars Props / Imperial Belt and Belt Boxes Project
Belt and Buckle Project:
-
The belt is constructed from a non-textured leather or a leather-like material.
-
Approximately 2" (50.8 mm) in width, up to 3" (76.2 mm) is acceptable.
-
There are no loops on the belt.
-
A single large snap or rivet is visible approximately 1" (25.4 mm) from the buckle.
-
The belt may be worn with the snap to the right or left of the wearer.
-
-
The buckle is constructed from a horizontally brushed metal, or metal looking material.
-
The buckle size is approximately 2 5/8" (66.7 mm) high and 4 1/8" (104.5 mm) wide with 0.5" (12.7 mm) radius rounded corners.
-
Buckle is adorned with an Imperial Code Disk at the center.
-
-
Please refer to the Imperial Buckle reference page for information on accurate and inaccurate style buckles.
-
-
Belt is made of leather.
-
Snap is worn to the left of the wearer.
-
Buckle has a slight horizontal curve.
Project: Day 1 - 8
I started this project by following Gaspanic's belt tutorial on the 99th website. i ordered the buckle from Tandy and the Imperial Codex greeblie from a member of the 99th. The buckle arrived with a lot of markings and discolouring from the manufacturing process, so i started hand sanding with a fine grade wet and dry paper, this get some of the marks out but not enought.. so after seeking advice i stared to use the power sander and after quite a few days the marks finally went.
The belt was quite fun to do as i went to a friends leather shop and used their equipment to make the belt, some imperial belts have groves along the top and bottom and look better than the plain ones so i did the belt that way.
So after attaching the Greeblie to the buckle and then the buckle to the belt i finally had a finished Imperial Belt..


Belt Boxes Project:
Large Boxes:
-
Dimensions are approximately 2 1/2" (63.5 mm) by 4 1/2" (114.3 mm) by 1" (25.4 mm) thick.
-
Two boxes may be worn, one on either side of the belt.
Small Boxes:
-
Dimensions are approximately 2 1/4" (57.15 mm) wide by 3 1/4" (82.55 mm) tall, by 1 1/4" (31.75 mm) thick.
-
Two boxes may be worn, one on either side of the belt.
For all boxes:
-
Box surfaces are smooth and have no decoration/ hinges/ visible holes or slots that do not appear on the screen-used boxes.
-
There is a covering on the back of each box with a slightly overlapping lip that is approximately 1/4” (6.35 mm).
-
Covering is secured by a rivets or small screws, on the top and on the bottom.
-
Project: Day 1 - 8
The Imperial Belt Boxes came in two sizes and were originally made from metal electronic project boxes, these boxes are not available anymore and modern day project boxes do not come in the correct sizes. The Large Boxes dimensions are approximately 63.5 mm by 114.3 mm by 25.4 mm thick and the Small Boxes dimensions are approximately 57.15 mm wide by 82.55 mm tall, by 31.75 mm thick.
Also each box lid had a slightly overlapping lip that is approximately 6.35 mm and covering is secured by a rivets or small screws, on the top and on the bottom.
Trying to get the exact measurements is really hard so I put a +/- 1mm variance in place.
Thanks to Darth Kaden of the 99th for the following images of the boxes:

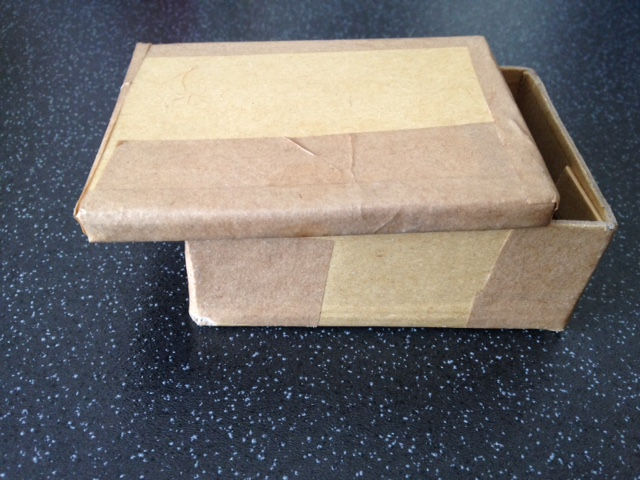
I started with the small boxes (57.15 * 82.55 * 31.75mm), using backing card, I cut out the box template and used double sided tape to stick the sides together, with supports. This give me a rough view of the sizes and dimensions but stability was an issue as it was quite flimsy.
Next I found some hard cardboard boxes in range, they needed cutting down as they were too big, these were very sturdy but did not seem quite right:


So I moved on to the next step and ordered some project boxes with lids (60 mm wide by 100 mm tall, by 25 mm thick), these will need cutting for both the small and large boxes.
The large boxes only need two cuts these were along the centre of the x and y axis, this then allowed for the extra dimensions to be added by sticking plastic to the inside of the pieces and reconstructing the box. This left a lot of gaps which needed to be filled, so I used some P38 filler, and then sanded down to a fine smooth finish


The small boxes needs more cuts, these were along the centre of the x,y and z axis, this then allowed for the extra dimensions to be added by sticking plastic to the inside of the pieces and reconstructing the box. This left a lot of gaps which needed to be filled, so I used some P38 filler, and then sanded down to a fine smooth finish like the large boxes, The boxes are finished but are quite heavy and when casted in resin will weigh quite a bit.


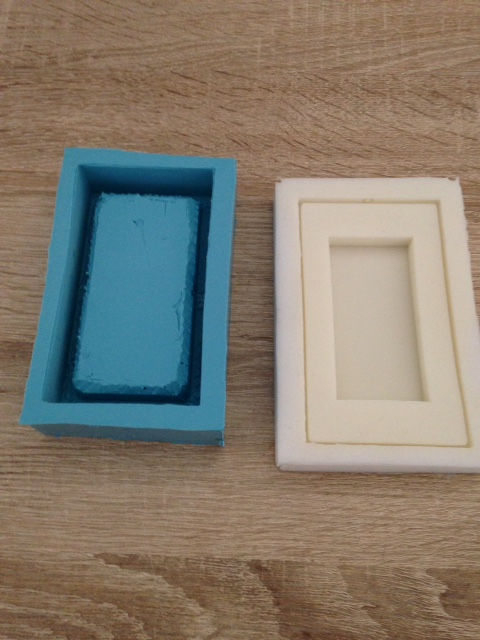
I decided to put my graphic design skills into play and designed a large and small box to the exact dimensions on the 501st CRLs including the rivits in the lids. I then used OooMoo to make the silicon moulds for casting.


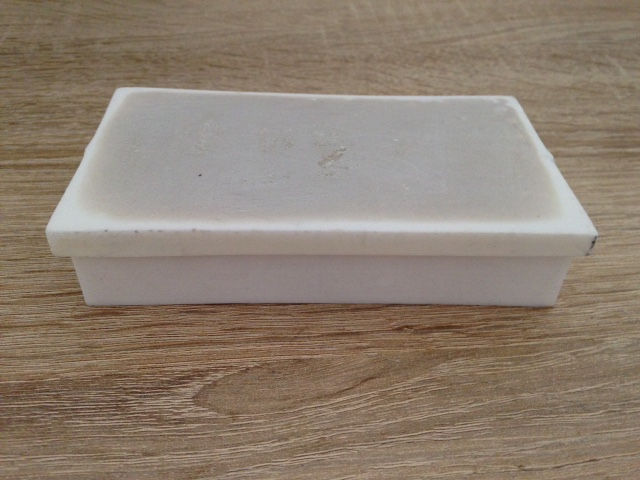
The resin was smooth-cast 310, which had a cure time of 2-4 hours and dried in white. the was no srinkage with the casting and a little after work was need to make the ready for painting. The first Attempt did not go well as the sides were to thin so i had to modify the origionals and make the sides a bit thicker.
The Small Belt Boxes:.


The Big Belt Boxes:.


Finished Belt Boxes:.


