ESTHER RIMINGTON - GAMES DESIGN PORTFOLIO
Esther Rimington / Star Wars Props / E-11 Blaster Project
E-11 Blaster Project:
The E-11 BlasTech Standard Imperial Sidearm, was a blaster rifle used during the time of the Galactic Republic, and manufactured by BlasTech Industries during the Galactic Civil War. It was the standard blaster rifle of the Imperial stormtroopers. A powerful, light and compact weapon, the E-11 was used widely through the galaxy.
This project will be based on the screen used E-11's in Empire Strikes Back. The E-11 blaster rifle props used in A New Hope and The Empire Strikes Back were built from a British-made Sterling Mark 4 L2A3 sub-machine gun, The scopes used on the E-11 props were actually World War II tank scopes, most notably the M-38 (but also M40 and M19), used in A New Hope, and the M19 in Empire Strikes Back.
Project: Day 1
I ordered a Doopydoos E-11 Blaster Kit as its one of the best kits out there, the kit arrived 2 weeks after been orderd.
So a brown box was delivered to day with a doopydoos sticker on it, i was really excited and wanted to plunge strait into the build but other things had to be finished first :( so a few hours later i finaly got around to opening the box and seeing my new E-11 kit. The kit was well protected in the box which had 2 seperate pieces (main body and folding stock) and a bag full of small pieces.
A lot of the pieces are going to need cleaning up as there is a bit of overcasting on them, but to start with they need a wash, so off to the sink they go.


Project: Day 2
Only got around to doing a few things as im in need of some bits and waiting for my dremil to arrive :)
Started off replacing the bolts in the muzzle of the blaster, used an 10mm bit to drill out the fake bolts and replaced with metal ones. I had to cut the head of the bolts off to make them fit. The grip was done the same but i fitted the entire bolt instead of cutting the head off.
So now to the fun of drilling the holes, I used a 12mm bit to drill the holes, to make them all look the same i used the bit on the holes all ready drilled, then started on the covered ones.... I got a few drilled before the battery on the drill ran out so now have to wait for it to charge :(.


Project: Day 3 and 4
Been a buisy few days and got quite a lot done on the blaster. Started with the folding stock, i wanted to add a bit more depth to the build so i drilled out the holes and hollowed out the area so i can put a round bar in it..
Dremmled down the folding stock mounting bolts to be replaced later, Fitted the bayonet clip, drilled and pinned the selector swich plus the trigger (with spring) and rounded the corners of the mag ready to engrave the word "off".
This is my helper with this project, hes called J and thinks the blaster is his.


Project: Day 5 and 6
Had a break from doing the blaster for a few days, so now back to the build. Have a lot of things to do still so I though I would start with doing the scope rail, I used a strip of alluminium 2mm x 20mm x 230mm was a bit of a pain to cut as my vice is not that good :( keeps opening.
Drilled out the switch on the handle, was not paying attention and actually drilled all the way through the handle so i ended up putting a nut on the end so the switch works. Was having trouble with the selector switch as it was not going to stay in place so i replaced the peg with a nut and bolt system (counter sunk the nut) and works quite well now..
Had a go with the engraving tool that came with the dremal, and got the "off" and arrow compleated, then drilled / countersunk a 6mm ball bearing in the magazine. been looking at the stock and the dowling rod, not really to sure about it as it does not look right.... what do you all think .....
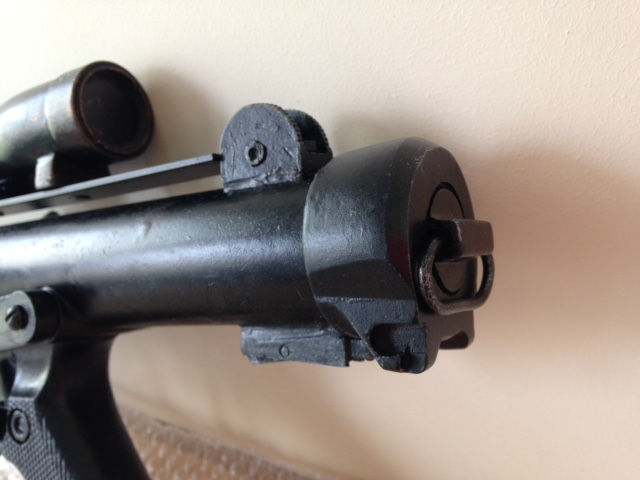
The front sight has had the inner parts cut out, as they did not cast very well and looked very bad. I cleaned up the outter parts and the put green stuff on to be able to put the pattern on. Im going to build the inner sight with green stuff but that will be later on.
On to a part that im not sure with, I got a metal potato peeler from asda and removed the handle to use as the bolt after attaching the screw (which will be in the charging handle) its functions right, i then used 20mm pipeing to create the barrel, the bolt fits nicely in the barrel so it will stay in place as the bolt is only 18mm and has room to move. The reason im not sure with this is im not keen on the barrel as its very tight and gives no clearance when looking through the vent holes. I have an 18mm aluminium pipe that i can use but still undecided.
I also moved that catch closer to the end cap to make it look a bit more right..


Project: Day 7 and 8
I got to thinking that i would like to make the ejector port to look right so i was going to cut it out and use the bolt to fill the gap with an internal section when its been cocked, the major problem i found was that when cutting the part out it was not going to be right due to the thickness of the doopydoos casting and the blike pipe they put in it. So in the end i left it as it was and filled the cuts i had made. :(
Fitted both parts of the front sight (not purfect but will do) and a quick spray of primer on all the blaster, this then allowed me to see the imperfections in the build and means i will have to use filler to make it more smother.
I also went for the aluminium pipe to make the barrel, looks quite nice. Made a spacer (pvc pipe cut to shape) for the bolt as its only 18mm and wobbled around, works quite well still need to make the spring. M
Was not to happy with the wooden dowling so cut some alumimium pipeing and wraped it around the dowling - only went 80% of the way arround so used filer to smoth the top part. Works quite well painted the top section black and will dry brush with silver.
Spent the day using filler and sanding to smoth the areas out, appied another coat of primer and a top coat of mat black.
..


Project: Day 9 and 10
Its time to do the finishing touches to the blaster, sprayed the blaster with grey primer, masked off everything except the grip - which is sprayed in gloss black - when dryed masked of the textured parts of the grip and sprayed the entire blaster mat black and dabbed with tissue paper.
To add a bit of depth to the project i then did some dry brushing on the blaster with silver, painted around the trigger mount and ejector port in silver. Dry brushed the scope with bronze and used a white crayon on the text on the scope. To finish it off i sprayed the blaster in mat varnish to offer some protection...